How to Install the Fractional CO2 Laser Machine in Clinics (Step-by-Step Guide for Dubai and UAE Practices)

how to install the Fractional CO2 Laser Machine

Table of Contents

More Posts

Send Us A Message

Share:

How to install the Fractional CO2 Laser Machine correctly is a critical question for aesthetic practices investing heavily in advanced skin resurfacing technology.

A single installation mistake can:

❌ Delay licensing approvals.

❌ Damage sensitive components.

❌ Void warranties.

That is especially true when setting up a CO2 laser machine for clinics in Dubai under strict health authority regulations. From electrical load requirements to room preparation, every detail matters. This guide walks you through the exact 80W fractional CO2 laser installation step by step to ensure safe setup, regulatory compliance, and smooth operation.

Bright yellow incandescent light bulb glowing strongly on a black background.
Upgrade Your Clinic with Advanced Medical Equipment

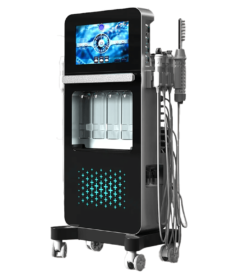
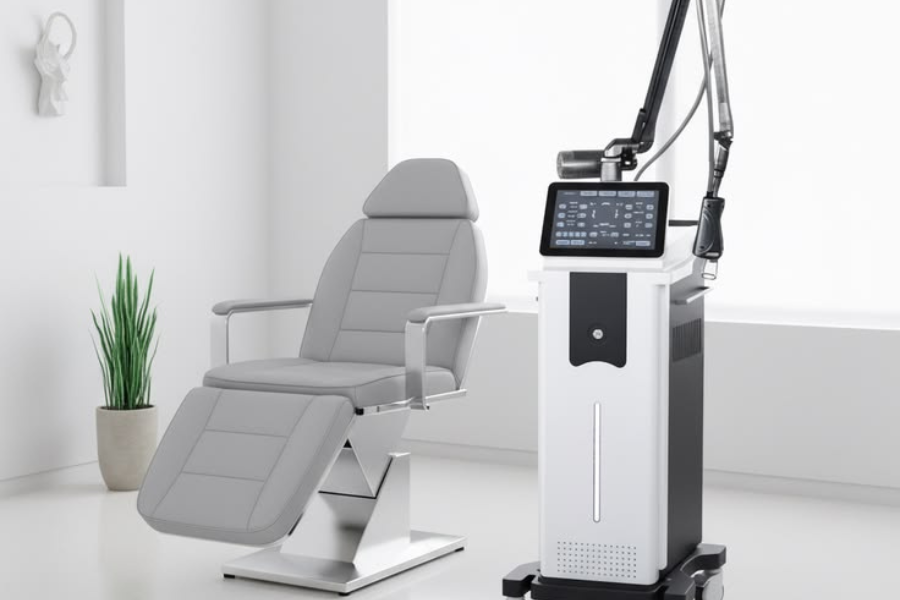
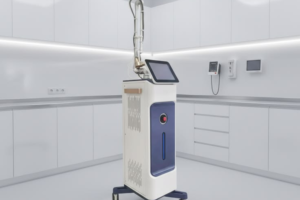
Discover high-performance Medical Equipment from Skyline Medical, including the 80W Metal RF Tube CO2 platform designed for precision, durability, and long-term clinical reliability.

Pre-Installation Requirements for CO2 Fractional Laser Installation in Dubai and UAE Clinics

Before starting any CO2 Fractional Laser installation, confirm your facility meets specific electrical and room standards. This is where most delays and equipment faults begin. A dermatology laser machine requires a dedicated power outlet, usually 220–240V, proper grounding, and a stable voltage supply to prevent system errors or internal component damage. This also helps protect against power fluctuations during medical laser machine installation UAE procedures.

Room conditions are equally critical. It requires maintaining a controlled temperature (typically 20–25°C), balanced humidity, and proper ventilation to protect sensitive laser optics. Also, plan sufficient space in the treatment room for safe operator movement and full articulated-arm rotation without obstruction. These pre-installation preparations for the CO2 fractional laser machine are essential to prevent compliance issues and protect your investment.

➕ Read more about: A Practical Guide for Clinics Choosing Fractional Laser Equipment in the UAE

How to Install the Fractional CO2 Laser Machine Step by Step?

How to install the Fractional CO2 Laser Machine correctly? Follow a structured, manufacturer-aligned sequence to avoid calibration errors, arm instability, or system faults. Precision during installation directly impacts safety, performance, and compliance, especially for practices using a CO2 fractional laser UAE setup.

The process begins with positioning the main unit properly, followed by unboxing and identifying all machine components. Next comes installing the 7-joint articulated spring arm, securely attaching the fractional head, and finally connecting the foot pedal and power supply. Each step must be completed in order to ensure accurate alignment and safe operation.

Below, we break down each stage in detail to guide you through a smooth and professional CO2 Fractional Laser installation process.

1️⃣ Positioning the Main Unit for CO2 Fractional Laser Installation

Proper positioning is the first safeguard against overheating and system malfunction. Leave sufficient airflow space around the unit from the start. During CO2 Fractional Laser installation, the main console of the CO2 fractional laser machine must be placed on a flat, stable surface with at least 20–30 cm clearance from walls to support air-cooling ventilation.

Avoid placing the unit near heat sources, direct sunlight, or enclosed cabinetry that restricts airflow. Ensure rear and side vents remain unobstructed to prevent internal temperature buildup, which can affect laser stability and component lifespan. Correct placement not only protects the cooling system but also allows safe operator access for maintenance and emergency shutdown if required.

➕ Read more about: 7 Common Mistakes Beginners Make in Medical Equipment Maintenance

2️⃣ Unboxing and Identifying CO2 Laser Device Components

Before powering anything on, verify every component is present and undamaged. This prevents delays during fractional head installation or gynecology laser probe setup. During CO2 Fractional Laser installation, carefully unbox and cross-check the full system against the product catalogue. If you buy the 80W Fractional CO₂ Laser System, your package should include:

  1. Main unit (Metal RF Tube system): 80W CO₂ source with air-cooling system.
  2. 7-joint articulated spring arm: Transmission system for beam delivery.
  3. Fractional head:120μm, 300μm, and 1000μm spot options.
  4. Surgical cutting heads: f=50mm, f=75mm, f=100mm.
  5. Gynecological head: 45° and 360° reflectors.
  6. Foot pedal
  7. Power cable
  8. Protective glasses
  9. Key switch

Confirm connectors, lenses, and reflectors are intact before proceeding to mechanical assembly.

3️⃣ Installing the 7-Joint Articulated Spring Arm for the Fractional CO2 Laser Machine Installation

Proper arm installation determines beam accuracy: if the alignment is off, energy delivery will be compromised. During fractional CO2 laser machine installation, follow these steps to install the 7-joint articulated spring arm properly:

  1. Begin by opening the designated installation port on the main unit of the fractional laser device.
  2. Carefully insert the 7-joint articulated spring arm vertically into the port.
  3. Ensure the articulated spring arm sits fully and evenly within the connection base.
  4. Secure the locking mechanism firmly to prevent movement or vibration during operation. 
  5. Once fixed, gently test the arm’s mobility, rotation range, and spring tension. It should move smoothly without looseness or resistance.

Correct alignment is critical because the articulated arm transmits the 10.6 μm laser beam; improper positioning can reduce energy precision, affect spot consistency, and impact treatment results.

➕ Read more about: Best Fractional Laser Machines Experts Recommend for Multi-Application Aesthetic Treatments

4️⃣ Installing the Fractional Head on an 80W Fractional CO2 Laser Skin Resurfacing Machine

Correct fractional head installation ensures precise spot delivery and safe energy transmission, so never rush this step during 80W fractional CO2 laser installation. Follow the steps in this order:

  • Start by selecting the appropriate spot size based on treatment goals: 120μm for scars and deep wrinkles, 300μm for large pores and texture improvement, and 1000μm for skin toning and tightening.
  • Then, attach the selected fractional head securely to the articulated arm connector, aligning it straight before tightening firmly to prevent beam deviation. Once installed, activate the red diode aiming beam to confirm accurate targeting and spot alignment.
  • For advanced procedures, install the appropriate surgical cutting head (f=50mm, 75mm, or 100mm) when performing precise ablation. 
  • If offering intimate treatments, complete the gynecological head installation using the 45° or 360° reflector attachment, ensuring firm and accurate positioning.

5️⃣ Connecting the Foot Pedal and Power Supply for CO2 Fractional Laser Installation

Power connection is the final checkpoint before activation; do it correctly to avoid startup errors or electrical faults. Like in any medical laser machine installation UAE, begin by connecting the foot pedal to the designated rear port on the main unit. Ensure the plug clicks firmly into place to guarantee responsive pulse control during treatments. 

Next, insert the power cable into the machine and connect it to a dedicated 220–240V outlet with proper grounding, as required for most CO2 fractional laser UAE systems. Insert the key switch into its slot on the control panel, then turn it clockwise to unlock system operation.

Once everything is securely connected, switch the system ON and verify that the display interface initializes without error messages before proceeding to calibration.

➕ Read more about: Anti Aging Equipment for Modern Clinics in 2026

Initial System Setup and Interface Configuration for Fractional CO2 Laser Machines

Correct fractional CO2 laser setup determines treatment precision from the first patient, so configure the interface carefully before clinical use. Once your Fractional Co2 Laser Skin Resurfacing Machine powers on, begin by selecting the appropriate operation mode. The 80W fractional CO2 laser system offers 7 available modes, allowing flexibility for resurfacing, cutting, and specialized procedures. 

One of the most advanced options is MIX Mode (Super Pulse CO2 Plus), which combines deep dot matrix treatment with superficial peeling. This enables collagen stimulation in deeper dermal layers while refining surface texture, delivering controlled ablation with a lower risk of unwanted side effects.

Next, adjust the core parameters as follows:

  • Set power (1–80W) and micro pulse energy (6–192mJ) to determine penetration intensity. 
  • Modify pulse duration (0.1–19.2ms) to control thermal exposure time. 
  • Fine-tune density, pattern size, and scan interval to regulate coverage and spacing. 

Higher energy and density increase treatment depth, while shorter pulse durations and wider intervals reduce thermal accumulation, balancing efficacy with safety.

CO2 Laser Calibration and Testing Procedure Before First Use

Never begin clinical treatments without proper CO2 laser calibration and testing. This step confirms beam accuracy and energy consistency. After completing your Metal RF tube CO2 laser setup, start by checking the red diode indication beam. Ensure it is centered, stable, and aligned with the targeting area, as this guides precise energy delivery during procedures.

After that, select a low power setting within your fractional CO2 laser settings to perform a safe test firing. Step on the foot pedal briefly and observe the emitted beam pattern on a suitable test material. Confirm that the dots appear evenly distributed and consistent in size and spacing.

The Metal RF tube ensures uniform energy distribution, but calibration verifies that optical alignment and internal transmission remain precise before patient application.

➕ Read more about: Aesthetic Clinic Equipment Package: A Smart Start for Profitable Clinics

Safety Checklist Before First Fractional CO2 Laser Treatment in Dubai Clinics

Before activating your system for the first patient, complete this final verification checklist. Even after mastering how to install the Fractional CO2 Laser Machine, safe operation of a CO2 laser machine for clinics in Dubai requires strict pre-treatment confirmation.

Pre-Treatment Safety Checklist:

  • Protective eyewear is available and worn by the operator, assistant, and patient.
  • Articulated arm securely locked and stable (no looseness or vibration).
  • Arm movement is smooth with proper tension and full range.
  • Spot test performed with consistent dot size and even energy output.
  • Red diode aiming beam centered and clearly visible.
  • Emergency stop button accessible and tested.
  • Room temperature maintained at 20–25°C.
  • Humidity level within 40–60%.
  • The ventilation system is functioning properly.

Proceed with treatment only after every item is confirmed.

Common Installation Mistakes to Avoid When Setting Up a CO2 Fractional Laser Machine

Most performance issues start with simple aesthetic clinic equipment installation errors. Avoid these mistakes to protect your CO2 fractional laser machine from early damage:

  1. Blocking air-cooling vents: Restricting airflow leads to overheating, internal stress, and reduced component lifespan.
  2. Incorrect articulated arm alignment: Misalignment affects beam transmission accuracy and compromises energy precision.
  3. Using an unstable voltage supply: Lack of grounding or voltage stabilization can damage sensitive electronics.
  4. Over-tightening surgical heads: Excess force may strain threads, misalign optics, or damage connectors.
  5. Skipping low-power test firing: Failing to test at low settings prevents early detection of calibration or beam inconsistencies.

➕ Read more about: Top Dermatology Equipment for Every Modern Skincare Clinic

When to Request Professional Fractional CO2 Laser Installation Support in the UAE?

If you’re unsure about electrical compliance, calibration accuracy, or system configuration, request professional installation support immediately. Advanced systems used for fractional resurfacing, especially a Super Pulse CO2 laser machine UAE, require precise setup to ensure safety, performance, and warranty protection for high-value aesthetic clinic machines.

Professional assistance becomes essential when handling full system assembly, articulated arm calibration, interface configuration, or MIX mode parameter setup, and here is where Skyline Medical technical services step in. Skyline Medical Requisites Trading LLC provides comprehensive support across the UAE, covering complete fractional laser installation, clinical setup, operator training, and structured after-sales service.

For clinics seeking reliability and regulatory confidence, professional support from Skyline Medical Requisites Trading includes:

Manufacturer installation support.

✅ On-site clinical training.

✅ Warranty activation and system validation.

Don’t risk costly setup errors or compliance delays. Partner with Skyline Medical Requisites Trading LLC for expert installation, hands-on training, and full warranty activation, so your CO2 laser system is clinic-ready, compliant, and performing at its best from day one.

Conclusion: Ensuring Long-Term Performance and Safety for Your CO2 Laser System

Precision today prevents complications tomorrow. Mastering how to install the Fractional CO2 Laser Machine ensures your co2 laser device operates safely, efficiently, and in full compliance with UAE standards. From proper assembly to accurate fractional co2 laser settings, every step directly impacts treatment outcomes and equipment longevity.

Preparing to install or upgrade your system? 👉 Follow this guide carefully, or consult certified professionals to guarantee a flawless setup.

How to install a CO2 laser lens?

To install a CO2 laser lens correctly, power off the system completely and allow the unit to cool before handling any optical components. First, remove the existing handpiece or lens housing carefully. Wear powder-free gloves to avoid contaminating the lens surface. Insert the new lens into the lens holder with the correct orientation (curved side facing the beam source, if specified by the manufacturer). Ensure it sits evenly without tilt. Secure the retaining ring gently. Do not over-tighten, as excessive pressure can crack the lens or distort beam alignment. Reassemble the handpiece, then perform a low-power test firing to confirm proper beam focus and spot consistency before clinical use.

What is the cost of a fractional CO2 laser?

The cost of a fractional CO2 laser depends on power output, tube type, brand reputation, and included accessories. On average, a fractional CO2 laser machine price ranges from $8,000 to $35,000+. Entry-level systems with basic features are typically more affordable, while advanced models with Metal RF tubes, Super Pulse modes, gynecology probes, and multiple handpieces fall at the higher end of the range. If you’re searching for a fractional CO2 laser for sale, request a detailed quotation that includes specifications, certification compliance, and long-term service coverage, not just the base unit price.

Which way does the lens go in a CO2 laser?

In most CO2 laser systems, the lens is installed with the curved (convex) side facing the laser source and the flatter side facing outward toward the treatment area. This orientation allows the beam to focus correctly and produce a precise, concentrated spot. However, lens direction can vary depending on the handpiece design and focal length (e.g., f=50mm, f=75mm, f=100mm). So, always confirm the manufacturer’s specifications before installation.

Can I make money from a laser machine?

Yes, when used strategically, a dermatology laser machine can become a powerful revenue driver for your clinic. However, profitability doesn’t happen automatically; it depends on consistent treatment demand, smart pricing, practitioner expertise, and strong patient retention strategies. High-demand procedures such as acne scar revision, skin resurfacing, wrinkle reduction, and pigmentation correction typically deliver attractive margins. More importantly, most laser treatments require multiple sessions, which naturally supports package sales, repeat visits, and long-term patient relationships.

How long does a CO2 laser machine last?

A CO2 fractional laser machine for sale generally lasts 7 to 10 years; however, its actual lifespan depends largely on build quality, frequency of use, and maintenance consistency. For example, systems equipped with Metal RF tubes tend to outlast traditional glass tube models, particularly in high-volume clinics where daily usage is intensive. Moreover, routine servicing plays a crucial role in durability. Maintaining proper cooling ventilation, ensuring a stable voltage supply, and performing accurate calibration all help preserve internal components and sustain energy consistency. Over time, high-usage practices may need to replace specific parts, such as lenses, articulated arms, or even the laser tube, rather than the entire device.

Can you clean a CO2 laser tube?

In most cases, you should not attempt to clean the internal CO2 laser tube yourself. The laser tube is a sealed component filled with gas, and opening or tampering with it can permanently damage the system and void the warranty. However, what you can clean safely are the external optical components, such as mirrors and focusing lenses, using approved lens-cleaning solutions and lint-free swabs. Dust buildup on optics, not inside the tube, is a common cause of reduced power output.

How to install a CO2 laser glass tube?

Installing a CO2 laser glass tube requires precision, electrical safety, and proper alignment. This is not a casual replacement. If done incorrectly, it can damage the power supply or misalign the beam path. First, power off and unplug the system completely. Discharge the high-voltage power supply before handling any internal components. Carefully remove the old tube, disconnecting the high-voltage line, ground wire, water-cooling pipes (if applicable), and signal connectors. Position the new glass tube securely into its mounting brackets, ensuring it is perfectly aligned with the mirror path. Reconnect the wiring exactly as specified by the manufacturer and confirm proper insulation. After installation, perform low-power test firing and beam alignment calibration before full operation. Because glass tubes operate under high voltage, professional technician installation is strongly recommended.

The Author’s Profile

  • Name: Malik Abu Shamaa

  • Profession: Biomedical Engineer

  • Experience: 7 years 

  • Expertise: Certified KaVo Expert

Equip Your Clinic with Trusted Devices

Recommended Products from Skyline